5 tips for taking iris photos with your smartphone
You see it more and more in big cities: shops where you can have a picture taken of your eye. You see all kinds of fantastically beautiful details: sometimes it seems as if you have tree stumps in your eye, it has been captured in such detail. Although it’s difficult to get such a professional iris photo, you can still get very close with your smartphone camera. We give you 5 tips how.
Contents
1. Eliminate reflections
One of the biggest challenges when taking an iris photo with your smartphone is not seeing any reflections in it. People may call eyes the mirrors of the soul, but they are mainly mirrors of windows, lamps and whatever you see around you that gives light. Very annoying. You can therefore choose to stand with your back to the light, but our experience is that it is better to stand somewhere where no light enters at all. However, there is still a challenge: to ensure that you do not see the smartphone itself reflected in your eye. That’s trying it out. So experiment with where you stand to take the picture and whether or not it is wise to use the flash (which lights up the smartphone quite a bit). Our advice is to put a black case on your device.
It looks like a window, but it’s really the back of a smartphone that reflects like this.
2. Try front and back
We don’t mean the eye here, but your phone’s cameras. With some phones you can go a long way with a selfie, while with other phones it works better to choose the better camera, which is often the main camera on the back. See if tapping on the screen works with focusing, but also see what a macro mode can do for you, for example. On some phones it zooms so well that you can get very close to a professional iris photo.
3. Experiment with the flash
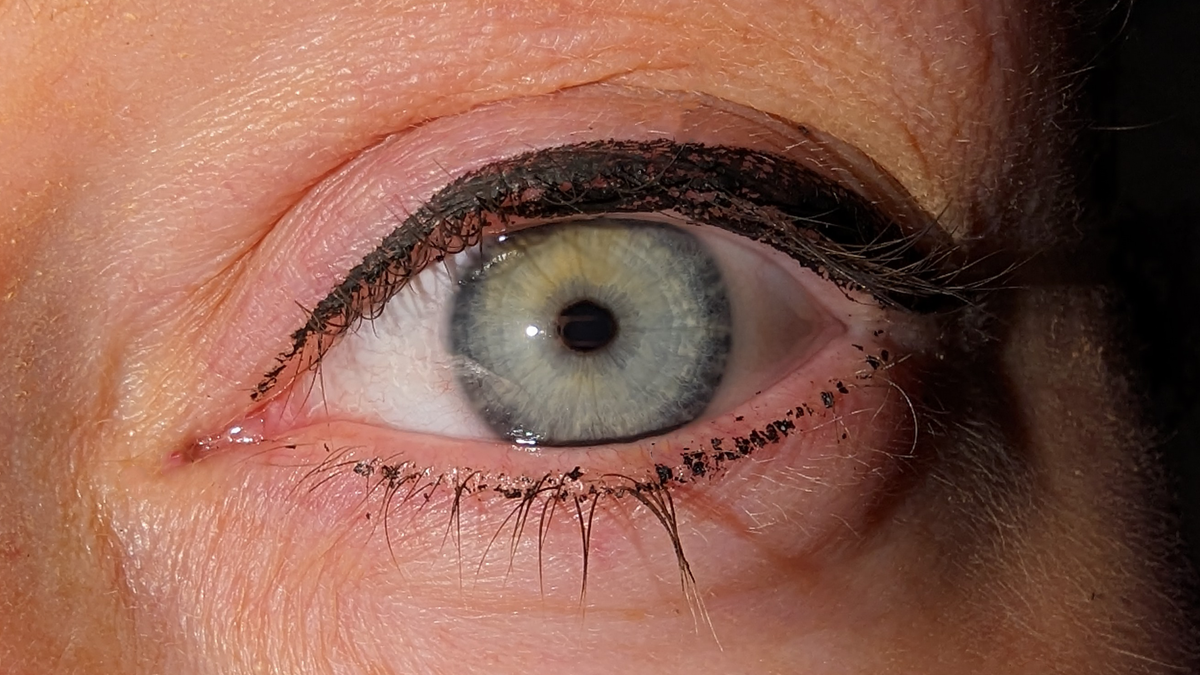
Our experience is that the iris photos with flash turn out best, but make sure you don’t take too many in a row. Otherwise you will see stars for a long time and that is not so nice for your eye. A flash photo on the selfie camera is often done by lighting up the screen, making it slightly less intense for your eye and still achieving a good result. However, on many phones the selfie cameras are not able to take a very good close-up photo, so make sure you take a little more distance here. You can always crop the photo later (we did that in this article).
This is what a professional iris photo looks like.
4. Spread your eyelids
Often there is just a piece of eyelid on the iris and that is a shame. You can also choose to remove your eyelid from your eye for a while. You do this with your thumb under your eye and your index finger above your eye and move them slightly apart. That’s not very comfortable, so don’t do it too long, but it does ensure that nice circle in the photo, instead of a circle with a top cut out. By the way, this method is best if you’re taking pictures of the iris with someone else, because otherwise you’ll probably be short of a hand.
Related articles
5. Use a mirror
If you want to experiment solo with iris photos, you can choose to use a mirror, for example, to see what your smartphone camera sees (especially if you use the rear cameras). You then have your phone in one hand and the mirror in the other hand. This method is a bit inconvenient if you also want to keep your eyelids away from your eye, so you better choose to open your eye very wide (as if you are very surprised, or like Lupita Nyong’o in Us) . Especially if you use the flash, it is wise to use the mirror, so that you don’t have to take the photo again too often and you expose your eye to too much unpleasant light.
Would you rather know how to take good photos of food? Then read 5 tips for good smartphone photos of food.