CoD Vanguard: Best settings for console
With the settings of Call of Duty: Vanguard you can get a little advantage in multiplayer. In the following we show you the best settings that you should make on your console.
Release:05/11/2021
Platforms:Xbox One, PlayStation 4, PlayStation 5, Xbox Series X
In addition to the best weapons, your settings are of course also important. Especially in fast first-person shooters like CoD, the settings can sometimes give you an advantage. But it’s not all about benefits. Some standard settings can even give you a small disadvantage, so you should definitely change them.
Note: However, some settings depend on your personal preference, not all settings necessarily have to be changed. A good example of this is the field of view, there is no such thing as a “best setting” because it depends entirely on you. But you should definitely change some settings.
Contents
- 1 Changes these graphics options
- 2 Disables the weapon fire limit
- 3 Change your sliding behavior
- 4 Set the dead zone of your sticks
- 5 Activated “Sprinting cancels reloading”
- 6 Change your field of vision
- 7 You can display the server latency and packet loss
- 8 Sets the mini-map shape to square
- 9 Turns off the crosshair movement
Changes these graphics options
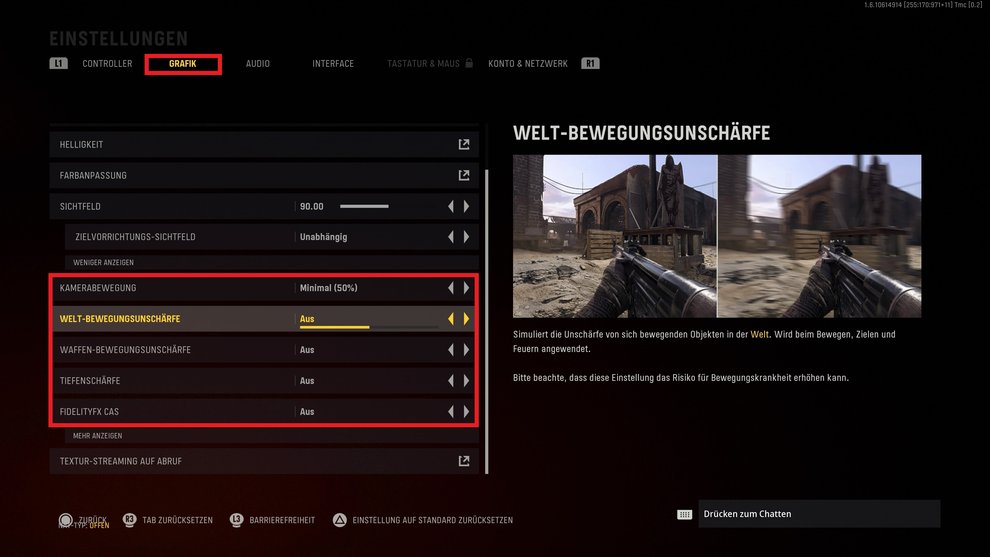
Under the “Graphics” tab you will find options that are extremely important. Provides the “Camera deviation” to 50%. In addition you should definitely set the “world motion blur”, the “weapon motion blur” and the “depth of field” to “off”.
Important: The depth of field can sometimes automatically switch to “On” again, this is due to a bug. Before starting the game, check the setting to see whether it has changed or not.
Disables the weapon fire limit
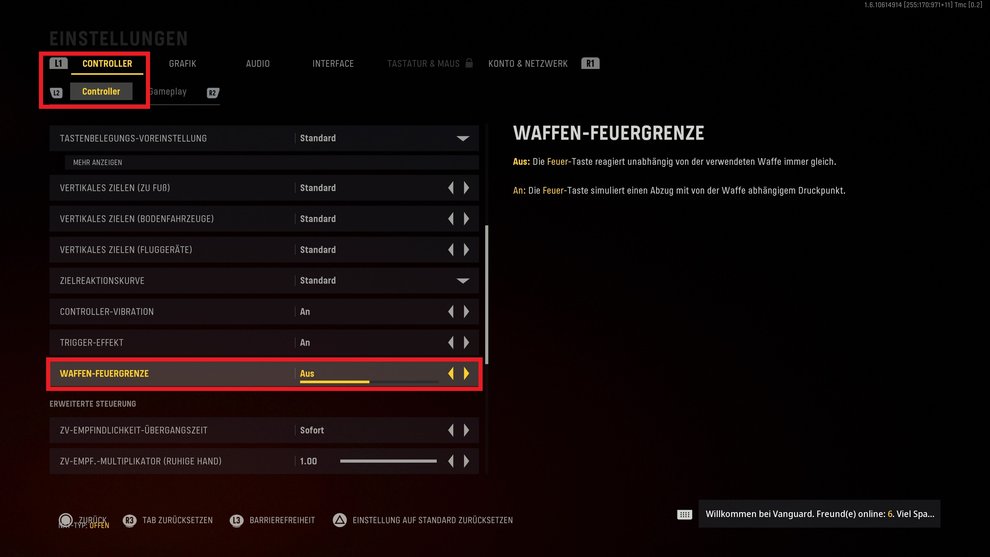
In the settings under “Controller” tab do you find the The option “weapon fire limit”, she issued. If it stays on, a different trigger behavior is simulated for each weapon, in which the fire activation depends on your pressure point. If you want to play competitively, each rifle should be activated with the same pressure point so that you can switch between the weapons without having to get used to it.
Change your sliding behavior
To do this, go to the “Controller” tab, then into the Gameplay tab and scroll down until you see the option “Slipping behavior” look. Put it up “To press”so that you can slide faster.
Set the dead zone of your sticks
Under the “Controller” tab you will also find the option of the dead area of your sticks. Look for it “Dead area minimum entry left (right) stick. The default is 10, which is a bit high for almost any controller. Put it down, but only so far that you don’t get an automatic stick drift. Under no circumstances should your aim move automatically without touching the stick. If you don’t know what the Deadzone is, you can take a look at our former guide to CoD Modern Warfare, through it you will get more information if you are not familiar with the topic. We have linked you to the article.
The dead area of the maximum input should be the default value of 99.
Activated “Sprinting cancels reloading”
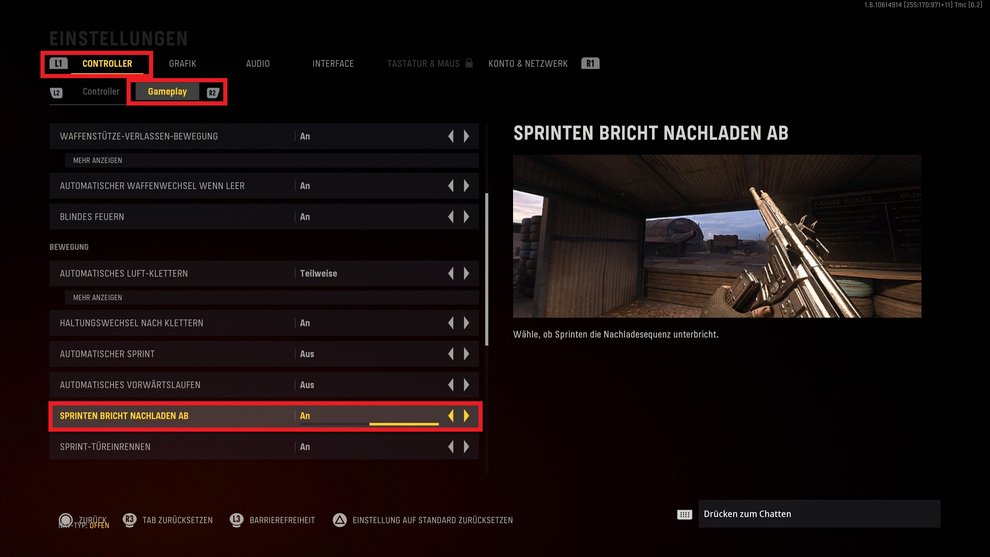
Sprinting should definitely abort your reloading process so that you are not surprised within a reloading sequence. Go to the “Controller” tab, then in the “Gameplay” tab and scroll down to you “Sprinting cancels reloading” see, set it to “On” there.
Change your field of vision
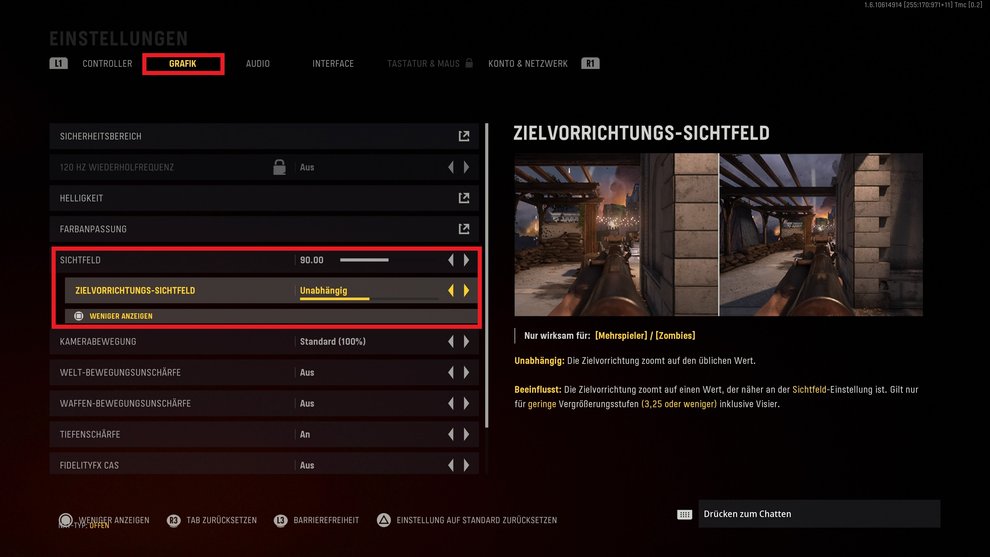
Go to the settings and select the “Graphics” tab, there you can adjust your field of view. The FoV (field of view) option was introduced on the consoles with Black Ops Cold War and you should definitely switch it. Most players get along best with a score of 90 to 100. You can also press Square / X (PS / Xbox) with this option to bring up the Aiming Field of View option. Set it to either Independent or Affected, but this option should be set to suit your taste. If you’re not familiar with the field of view option, check out our linked guide for more details.
You can display the server latency and packet loss
Go to the “Interface” tab and scrolls down. There are the options “Server Latency” and “Packet Loss” set both to “Displayed”. So you can always see in the upper left corner whether you have connection problems.
Sets the mini-map shape to square
It is actually the default setting, but you should still make sure that you get the “Mini card shape” on square adjusts. When you put them on “around” is yours Minimap 27% smaller, which puts you at a great disadvantage. To do this, go to the “Interface” tab and scroll down until you see the option.
Turns off the crosshair movement
Under “Interface” you will find the option “Crosshair movement”, she definitely exhibits. As a result, the crosshairs stop following each other when the camera moves.
Do you have any more tips about the settings? Feel free to write them to us in the comments!
