Use Snapchat on the PC – this is how it works
Snapchat can also be used on a PC with the “Snap Camera” program or BlueStacks. We show how this works.
Version:varies
Languages:German
release:09/04/2013
Platforms:Android
Contents
Use Snapchat for Web on PC
Since July 2022, Snapchat premium users have been able to use the “Snapchat for Web” service on their PC. For the time being, however, this only applies to the countries “United States”, Great Britain, Canada, Australia and New Zealand. For GermanyFrance, Saudi Arabia and the “United Arab Emirates” it does not work yet, but it is planned.
Thats how it works:
- Opens the Web version of Snapchat.
- Log in with your user data.
- You can now use the usual Snapchat functions on the desktop PC.
Install Snapchat app in Windows 11
As an alternative to the above method, Windows 11 supports Android app installation. There you can install Snapchat in Windows with our instructions:
Use Snapphat on Windows 10 PC with “Snap Camera”
If you have a webcam, you can use the official program “Snap Camera” to use the coveted Snapchat lenses and effects on the PC as well. Once installed, you can apply different Snapchat lenses and either record or stream it to gaming platforms like Twitch or YouTube.
The attached masks and faces can also be used with apps such as Skype. Streaming and recording programs such as OBS Studio are also compatible. The whole thing then looks something like this:
Minimum system requirements:
Windows 10 64-bit / macOS 10.11
Intel Core i3 2.5Ghz / AMD Phenom II 2.6Ghz with 4GB RAM
Intel HD Graphics 4000 / Nvidia GeForce 710 / AMD Radeon HD 6450
Screen resolution: 1280 x 768 pixels
How it works:
- Load yourselves Snap Camera down.
- Then click on the EXE file to install Snap Camera (for macOS it is the PKG file).
- During the installation, Twitch users must then install the “Snap Camera Twitch extension”.
- Activate your webcam if necessary and open “Snap Camera”.
Image source: snapcamera.snapchat.com - You will see a preview of the output image.
- Select a Snapchat Lens at the bottom to apply it.

If you want to use the video output from Snap Camera in programs such as Skype, you must select the “Snap Camera” entry instead of your webcam in the respective program. You can find more help on the Snap Camera support page.
Use Snapchat app on PC with BlueStacks
If you want to use the “normal Snapchat” on the PC, there is no separate program for this. However, this can still be done with a trick. You simply install an Android-like environment in which the Snapchat app can then be opened. This can be done, for example, with the Android emulator “BlueStacks App Player”:
Sometimes there are also Windows 10 apps with which you can use Snapchat on the PC. However, since Snapchat takes action against such third-party apps, your Snapchat account can be blocked as a result. We therefore do not recommend such guides.
Install Snapchat
- Install the software “BlueStack App Player”.
- Start the emulator and open the “Play Store”.
- Sign in with your Google account if prompted to sync your Android contacts.
- Install Snapchat in the emulator via the “Play Store” and launch the app.
- Log in with your account.
Snapchat login in BlueStack Apps Player.
Now you can use Snapchat in this way on the PC and chat with your contacts and friends. However, Snapchat does not recognize the PC webcam. But you can import pictures from the PC into messages. You can see how this works below.
Use Snapchat on PC
- Opens a chat to a contact.
- Type in a message.
- Now you can select a media file.
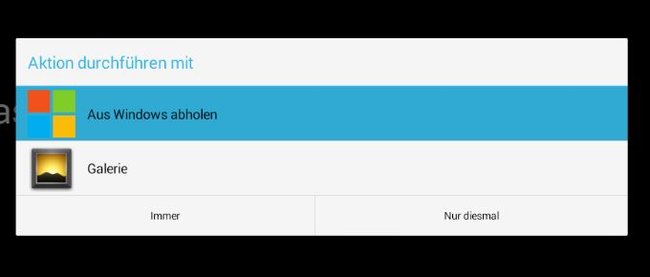
- Since no photos are stored on this virtual Android device and the PC webcam cannot be used, you click on “Get from Windows“.
- Now select the images that are saved on the PC to upload them to Snapchat.
Console emulators for Android are based on the same principle. With them you can play Nintendo classics on your smartphone.
Don’t want to miss any more news about technology, games and pop culture? No current tests and guides? Then follow us
Facebook
or Twitter.


