What is behind it, how it works and why it is so important
Our guest author explains the background, shows best practices and typical Git workflows – nobody in the team misses a turn and the collaboration succeeds.
Most software developers come into contact with the Git version control system sooner or later, and branching and merging are on the agenda at the latest in the first large project with more than one team member. But what exactly is a branch in Git? And what happens in a merge?
Contents
Next branch: teamwork
Imagine that you are working on a software project with other colleagues; your team is developing and designing a webshop. Perhaps you are sitting together in an office and discussing the tasks at hand during the coffee breaks. However, it is more likely that your workplaces are in different locations, possibly even in multiple countries or time zones.
While a developer has an idea for a new feature and wants to start coding immediately, a colleague receives a call from the customer: A bug in the online shop must be fixed quickly. At the same time, a support employee tries to bring the documentation up to date.
In such a scenario, it is difficult to impossible not to get in each other’s way. Any code change always affects everyone else. A commit history in Git with a single main branch could look like this:
(Graphic: Tobias Günther)
The dashed red lines show how confusing the whole thing is. Which commit belongs to which feature? And on what code basis will it continue in the future?
See the forest for the branches
Let’s bring structure into the project and into the team: Git Branches. A branch is a branch from the main development line – you should always take such a branch if you want to leave a (stable) code base in order to implement a new feature or a hotfix, for example. Instead of the rather chaotic workflow, a project with branches could look like this:
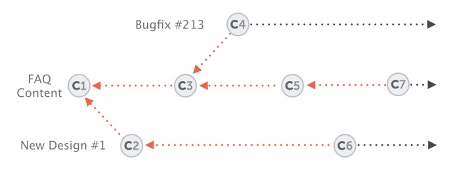
(Graphic: Tobias Günther)
Every small or large change occurs in a separate branch that cannot affect the stable basis – like in a kind of sandbox. If an error occurs in one branch, it has no effect on the other branches and they are still safe. Does the hotfix work? Has the new feature been tested extensively and found to be good? It is then possible at any time to merge a branch with the main line (merge).
Most version control systems (VCS) support some form of branching; the function is therefore not a unique selling point of Git. Branching in Git is so clever and lightweight that branching and switching between the development branches is almost instantaneous and takes up significantly less hard disk space than with other VCS.
Let’s summarize:
- A branch is a completely independent development line with its own history.
- Branches require less disk space than simple copies of the project folder.
- Merging is usually straightforward and usually takes place without user interaction.
- Real teamwork is possible with branches; they encourage collaboration between multiple developers.
Tree maintenance: workflow with branches in Git
Branches in Git are part of the workflow. In most projects there are several branches that are being worked on in parallel, and merging them several times usually works without any problems. Many teams have agreed on a certain workflow and determined that only stable code is in the main branch (mostly master or main). Whenever a feature branch gets the green light and is considered stable, it is merged with the master. So there are two different types of branches:
- Long-lasting branches (long-running): They are retained throughout the life of a project and are not tied to specific features. In addition to the main line, there are often other long-lived branches such as staging or production that represent certain stages.
- Short-lived branches, also known as topic branches: New functions or bug fixes usually end up in short-lived branches. The branches are therefore not intended to be maintained throughout the life of a project. Instead, they are created to experiment, to implement new ideas, or to fix bugs. Once a short-lived branch has been integrated into a long-term branch, it can be deleted.
Tip: It has proven to be best practice never to commit to long-term branches. Code should only be specifically integrated into the main line. In many projects there is a select group of developers who have sole authority to do so.
In practice: branching and merging
The command of the same name “git branch” is used to create, list, rename and delete branches. To create a new branch, write the branch name after the command. Without further information, the command lists existing branches:
$ git branch new-design
$ git branch
Bugfix # 213
new-design
* master
staging
The asterisk indicates which branch you are currently in, i.e. the current HEAD. The HEAD file is a pointer to the current branch reference. To switch to the new branch, use the command “git checkout” – the parameter “-b” is a practical abbreviation. How to create a new branch and switch to it at the same time:
git checkout -b new-design
Danger: The creation of new branches with “git branch” always happens in the local repository. The new branches only migrate to the remote repository on the server when you publish an existing local branch via “git push -u origin”.
Did you make a mistake while creating a branch? It does happen, but it’s not a problem. The command …
git branch -m
… renames the current HEAD. If you want to rename a different branch, then enter the old and the new name after “git branch -m”.
The same applies here: This is only possible in the local repository. To rename a remote branch, two steps are necessary: delete the old branch and push the new branch from the local repository:
git push origin –delete
git push -u origin
The parameter “-d” is used to delete a branch; behind it is the name again:
git branch -d
It is possible to specify multiple branch names. However, if a branch contains changes that have not yet been merged, deletion does not work without further ado. In this case the parameter “-f” helps, which forces the process – be careful, data loss!
To switch between branches, you can either use “git checkout” or the “git switch” command introduced around two years ago.
At the end of this practical part, we would like to briefly talk about merging, the so-called merging. This will take over all new commits from another branch in the current HEAD branch. Only two commands are required for this:
git switch staging
git merge feature / new-layout
The first command changes to the branch that is to incorporate the changes made by the other, the second executes the merge with the branch that contains the modifications.
Got to the green branch
Branches belong to Git like a trunk and branches to a tree. Once you have understood the concept, you will not only find it easier in your own projects, but above all you will strengthen teamwork.

Tobias Günther is one of the founders of Tower, a popular desktop GUI for Git on Mac and Windows. In addition, Tobias has helped many developers to better understand Git and use it more productively in countless blog posts, workshops and talks.